

Protecting Offshore Leaders from Coral Abrasion
Table of Contents
- Why Coral Abrasion Threatens Offshore Leaders
- Step 1: Assess Your Fishing Leader Abrasion Resistance Before You Rig
- Step 2: Choose Chafe Tubing for Fishing Leaders
- Step 3: Rig and Install the Tubing on Your Leader
- Step 4: Control Boat Position and Anchor Placement Near Reef
- Step 5: How to Inspect a Fishing Leader for Damage
- Step 6: Respond to a Coral Abrasion Incident
- Offshore Crew Protection Checklist
- Frequently Asked Questions
Last Updated: October 18, 2026
Why Coral Abrasion Threatens Offshore Leaders
Coral abrasion is the physical wear a fishing line takes when it rubs against living reef structure. On heavy tackle, that wear happens fast.
Here is the part most crews learn the hard way: the fight is not where leaders fail. At Titan Guard Chafe Tubing, we build sleeving for exactly that problem.
Three things make offshore work brutal on leaders:
- Reef edges sit where big fish feed. Tuna and billfish push bait against structure.
- Boat drift is constant. Current and wind move the hull while lines are out.
- Heavy tackle loads the line. A tight drag turns a light rub into a deep gouge.
Protecting offshore leaders from coral abrasion comes down to six repeatable steps. Below, we walk through each one in order, from rigging to incident response.
Step 1: Assess Your Fishing Leader Abrasion Resistance Before You Rig
Test abrasion resistance before you tie anything. Run a thumbnail test along the leader, then bend it sharply. Any roughness or chalky feel means the line is already compromised.
Fishing leader abrasion resistance depends on three factors:
- Diameter. Thicker mono resists wear better but drags more in the water.
- Condition. Sun, salt, and age weaken line long before it looks bad.
- Contact load. A leader that rides reef gets punished every drift.
A common mistake is trusting a leader because it "looked fine." In practice, a leader that has dragged across coral once should be retired, not re-rigged. Check every leader before it goes on the rod, not after the first missed fish.
Step 2: Choose Chafe Tubing for Fishing Leaders
Chafe tubing for fishing leaders is a protective sleeve that sits over the working end of the mono. It takes the reef contact so the leader does not. That is the whole job, and it is the cheapest insurance on the boat.
What to look for:
- Wall thickness. Thin sleeving wears through too fast on reef.
- Fit. Loose tubing slides and abrades the leader underneath.
- Material. Heavy-duty sleeving should shrug off coral and sharp teeth.
We make our sleeving for exactly this use: monofilament protection against abrasion and fish teeth, built in our family-owned factory in the Finger Lakes Region of New York.
Matching Tubing to Your Leader Diameter
Match tubing to leader diameter so it grips without crushing the line. The sleeve should slide on with firm resistance and stay put under load.
| Leader Class | Tubing Fit | Use Case |
|---|---|---|
| Light mono | Snug, thin wall | Inshore and light offshore |
| Mid mono | Snug, standard wall | General tuna and billfish |
| Heavy mono | Firm, heavy wall | Reef edges and wrecks |
| Wind-on systems | Matched to splice | Protecting the splice joint |
For wind-on leader systems, run the sleeve over the splice itself. That joint is the weakest point, and it is the first place reef contact will find.
Protective Clothing and Equipment for Offshore Crews
Chafe tubing protects the leader. It does not protect the people handling it. Offshore leaders and deck crews face the same coral contact risks as divers, scrapes, cuts, and skin abrasions, plus line-handling hazards that recreational anglers rarely encounter.
Compare protective options by coverage, fit, durability, mobility, and task suitability:
- Wetsuits (full or shorty). Best overall coverage against coral scrapes and sun. Neoprene of 3 mm to 5 mm is common for warm-water work; thicker suits restrict mobility but add puncture resistance. Full suits protect arms and legs; shorties leave calves and forearms exposed, exactly the areas most likely to contact reef when handling lines near the transom.
- Dive skins and rash guards. Lightweight, high mobility, and quick-drying, but minimal puncture or abrasion resistance. Suitable for topside work and light in-water tasks, not for bracing against reef.
- Gloves. Cut-resistant or abrasion-resistant gloves protect hands during line handling and fish release. Fit matters: loose gloves snag on leaders and hooks; tight gloves reduce dexterity for knot work. Many crews keep one pair for rigging and one for in-water work.
A common pattern among working crews is to layer: a dive skin under a shorty wetsuit for mobility plus coverage, with gloves reserved for line-handling tasks.
Balancing Worker Protection With Reef Protection
Every piece of protective gear also reduces the chance of accidental coral contact. A gloved hand that would have grabbed a coral head to steady itself instead grips a rail. A suited crew member who enters the water is less likely to flinch into reef. The same equipment that protects workers also protects the reef, provided crews follow the contact-avoidance practices in the steps that follow.
Step 3: Rig and Install the Tubing on Your Leader
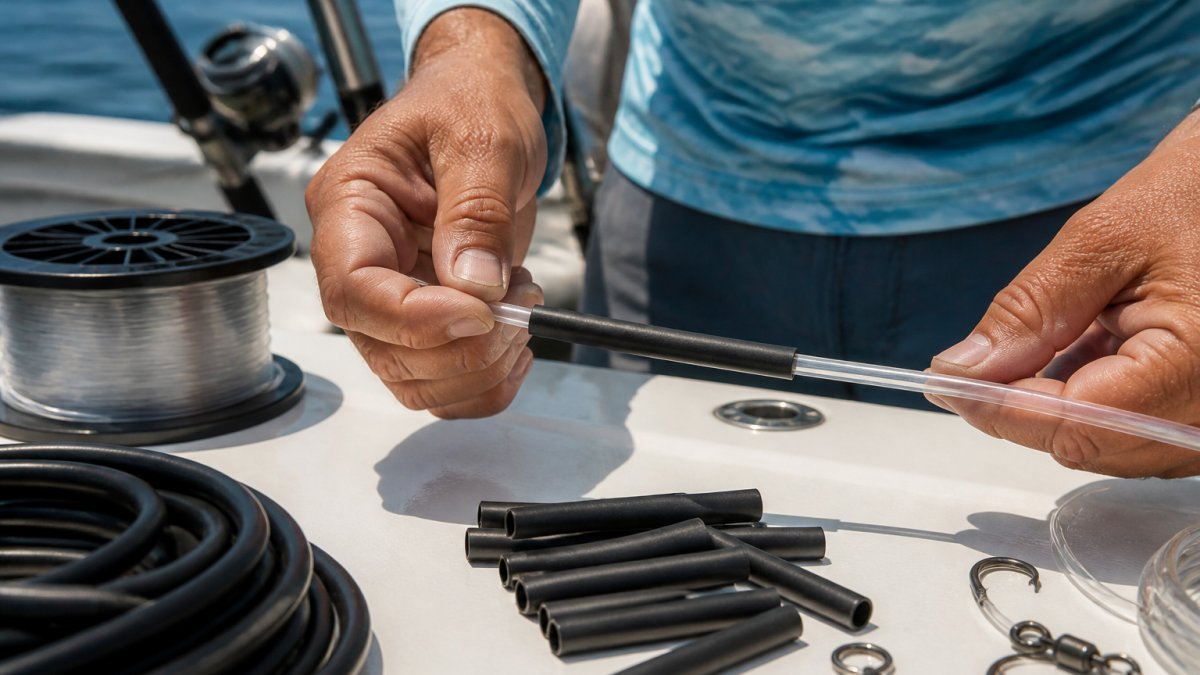
Install the tubing before you tie your terminal connection. Cut a length that covers the working end, then slide it on dry.
Follow these steps:
- Cut tubing to cover the section that contacts reef.
- Slide it onto the leader before tying your knot.
- Seat the sleeve over the splice or working end.
- Wet the leader and draw the knot down tight.
- Check the sleeve sits flush with no gaps.
The whole job takes minutes. Do it once per leader and it stays put for the trip.
Step 4: Control Boat Position and Anchor Placement Near Reef
Boat handling prevents more coral abrasion than any piece of gear. Keep the hull off the reef and your lines stay clear of structure.
Responsible boating and anchoring near reef means:
- Anchor in sand, not coral. Sand holds and does no damage.
- Watch the drift. Reposition before lines drag the bottom.
- Keep distance from the reef edge. A few extra feet of water saves leaders.
Current pushes the boat, and the boat pushes the lines. If you are not managing position, the reef is managing your leader for you.
Step 5: How to Inspect a Fishing Leader for Damage
Inspect a fishing leader for damage after every reef contact and at the end of each trip. Run your fingers along the full length, then look at it in good light.
Check for:
- Rough patches or fraying
- Flat spots from pressure
- Discoloration from heat or wear
- Any nick near the tubing edge
Chafe tubing protects the leader but can hide wear. Pull the sleeve back and inspect underneath. A sleeve that looks fine can be covering a damaged leader.
Skipping the under-sleeve check is a common rigging mistake. A leader that fails at the hookset usually looked perfect from the outside.
Step 6: Respond to a Coral Abrasion Incident
Respond to a coral abrasion incident by stopping the contact first, then treating any injury before assessing gear.
Step-by-Step Response After Coral Contact
- Stop the drift and move off the reef. Reel in and reposition the boat so no one else contacts structure.
- Assess for injury. Coral scrapes and cuts are common when crew members brace against reef or handle lines near structure. Check hands, forearms, and lower legs first.
- Clean the wound immediately. Rinse with clean fresh water or sterile saline. Coral cuts are prone to infection. Remove visible debris with sterile tweezers; do not scrub aggressively.
- Control bleeding and dress the wound. Apply direct pressure for bleeding, then cover with a sterile dressing. Keep the wound dry and clean until it can be properly evaluated.
- Monitor for signs of infection. Watch for increasing redness, swelling, warmth, pus, or fever over the next 24 to 48 hours.
- Seek medical care when indicated. Deep cuts, puncture wounds, wounds that will not stop bleeding, or any sign of infection warrant professional evaluation. Crew members with diabetes or weakened immune systems should seek care earlier rather than later.
- Inspect and retire damaged gear. Pull the sleeve back and check the leader underneath. Retire any leader with visible damage and re-rig with fresh mono and new tubing.
- Log the incident. Record the location, depth, damage, and any injury. Over a season, those notes show which reef edges cost the most gear and which tasks carry the highest contact risk.
Marine Animal and Coral First-Aid Supplies
Keep a dedicated first-aid kit on board for coral and marine animal contact. A practical kit includes:
- Sterile saline for irrigation
- Sterile gauze and adhesive dressings
- Tweezers for debris removal
- Antiseptic solution
Store the kit where crew can reach it without entering the water, and check it before every trip. Expired supplies are a common failure point.
Using Near Misses to Improve Procedures
Not every contact produces an injury or a lost leader. Near misses, a line that brushed reef without failing, a hand that pulled back before contact, are valuable data a crew can collect. Log them the same way as incidents. Over time, the pattern can show which drifts, depths, and tasks carry the highest risk, and procedures can be adjusted before a near miss becomes an injury or a lost fish.
Treat every coral contact as two incidents, one for the gear and one for the person. Stop the contact, treat the wound, inspect the leader, and log both. Coral abrasion losses can trace back to boat position and skipped inspections. Improving the process can help gear last longer.
Offshore Crew Protection Checklist
Use this checklist before every trip and after every reef contact. It takes a few minutes and saves leaders.
- Inspect all leaders for roughness before rigging
- Match tubing to leader diameter and splice
- Install sleeving over the working end and splice
- Confirm anchor is set in sand, not coral
Run the checklist as a crew, not solo. A second set of eyes catches the wear one person misses.
Frequently Asked Questions
How should I treat coral scrapes?
Rinse the scrape with clean fresh water or saline, then wash gently with mild soap to remove coral fragments and bacteria. Apply an antibiotic ointment and cover with a sterile bandage. Watch for redness, swelling, or warmth over the next 24 to 48 hours, since coral cuts can carry marine bacteria that cause slow-healing infections. Seek medical attention if symptoms worsen or a fever develops. Keep a marine animal first-aid kit on board so treatment starts before you reach shore.
How does chafe tubing protect fishing leaders from coral?
Chafe tubing for fishing leaders adds a sacrificial layer of heavy-duty sleeving over the monofilament where it contacts reef, wreck, or boat hardware. When the leader rubs against coral, the tubing absorbs the abrasion instead of the line. That preserves fishing leader abrasion resistance at the critical terminal section. Install the tubing over the section most likely to contact structure, then inspect it after every trip. Replace the tubing when it shows deep scoring or flattening.
How often should you inspect a leader after fishing near coral?
Inspect the leader after every trip that involved contact with reef or structure, and run a quick feel test any time you re-rig during the day. Run the line between your fingers to detect roughness, flattening, or nicks. Hold it against light to spot cloudy or frayed sections. Cut back and re-tie any damaged section before the next cast. If the abrasion reaches past the tubing, replace the leader rather than fishing a weakened line.
How can anglers reduce damage to coral reefs while fishing?
Keep anchors off live coral and use reef-safe mooring where available. Hold the boat upcurrent so the leader stays clear of structure, and avoid dragging lines across the reef during a fight. Use chafe tubing to reduce the need for heavy leader that saws into coral, and retrieve any marine debris or cut line. Follow local reef protection rules and practice responsible boating. These habits lower injury risk to marine life and keep the reef intact for the next trip.
Coral abrasion is a process problem before it is a gear problem. Control your position, inspect honestly, and sleeve the working end of every leader. Titan Guard Chafe Tubing builds heavy-duty sleeving for monofilament leaders, made in our family-owned factory in the Finger Lakes Region of New York, with fast shipping and hassle-free returns. Shop Titan Guard Chafe Tubing and rig every leader with protection that holds up on the reef.